TFS Release Definition – Custom variables and values

Scenario – Sometimes we need to use some logic based data in a variable in Release definition task like datetime value. Example, You want to create backup folder with datetime folder to preserve the backups.

There is no direct way in TFS for achieving it. TFS does have some user defined variables that can be used for defined values but for such requirements in release, it does not have any.

To implement it, I did below steps –

  1. I defined variable in release definition and set the value to “none”. Example here is – backupfoldername and value is none.
  2. I added task for PowerShell script and added below Inline script to set the above defined variable with date time value –

$date= (Get-Date).ToString(‘MM.dd.yyyy-hhmmsstt’)

Write-Host “##vso[task.setvariable variable=backupfoldername]$date”

  1. Finally I added the release task where I wanted to use it and used it as $(variablename) like $(backupfoldername). It worked!

TFS–MAC build–Git error

I was trying to build one of my iOS based application in MAC from TFS. While trying to do so, I was getting error –

“error setting certificate verify locations:

  CAfile:/etc/ssl/certs/ca-xxxxx.crt

  CApath:/etc/ssl/certs/..”

Error screenshot is given below as well…

image

I was struggling to resolve it and I have not found much information on internet.

Finally, I am able to resolve it and wanted to share it here so that it can help all…

I looked into “system” and “global” git files and they were setup properly with all the required values of the certificates.

You can view these files using below commands –

System file – “git config –system –list

Global file – “git config –global –list

I have to give full access on the certs folder (/etc/ssl/certs) using the command –

sudo chmod –R 777 .

With it, it worked!

Important note – Many have given solution to turn off the SSLVerify which is absolutely not recommended way from security perspective.

How to publish build artifacts from iOS builds to Windows based drop location

The requirement is to publish the TFS build artifacts (output) of Xamarin.iOS or any iOS based application to the file share (drop location) based on windows environment.

As per the MS documentation, Publishing artifacts from a Linux or macOS agent to a file share (drop location) is not supported, we have to use some other way to achieve the same behavior.

Here is the option we have implemented and can be used –

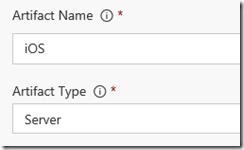
1) In the build definition, add the task to publish the artifacts.  Select the Artifact Type as “Server” as shown below –

image

Note – This will save all the artifacts on the TFS database (SQL Server) and so it is recommended to have the retention policy in place to delete the unwanted artifacts from the TFS database.

2) Now, when you build the application using above publish option, once the application is build successfully, you can download all the Artifacts from the TFS web portal as shown below –

image

3) Now, if you want to have the build Artifact on some file share, you can not use the above task in iOS as said before that it is not supported for MAC agent. The workaround would be to have a release definition just to copy the build artifacts to the drop location with “Continuous Deployment” as a trigger so that as soon as build is done successfully in MAC, its build artifacts will be copied to the file share. This way you will have your build output in the file share just like the way you do for windows based agents.

image

a) Release definition creation screenshot

image

b) Release Definition with Task screenshot

TFS – Release automation – IIS based Websites

Here is the best practice for the release automation of IIS based applications –

Scenario 1 –

New Web applications –

Add below tasks in the given order –

  1. Copy task – Copy the website published code from build drop location to web server.
  2. Tokenization task – task for replacing required values in different environments.
  3. Any other requirement on the web folder like subfolder creation or folder permissions
  4. IIS Website creation task – Task to create website and its application pool. It also configures various required settings in IIS like authentication etc.
  5. Application pool start/stop task – Select the “Restart” option to restart the application pool.

Scenario 2 –

Upgrade Web applications –

Add below tasks in the given order –

  1. Application pool start/stop task – Select the “STOP” option to stop the application pool.
  2. Backup utility task – Take the backup of the existing web folder.
  3. Copy task – Copy the website updated published code from build drop location to web server.
  4. Tokenization task (If there are changes in config files)– task for replacing required values in different environments.
  5. Any other requirement on the web folder like subfolder creation or folder permissions
  6. Application pool start/stop task – Select the “START” option to start the application pool.

Please use below tasks for –

  1. IIS Website Application pool start/stop/restart (https://marketplace.visualstudio.com/items?itemName=mohdaslamansari.build-task)
  2. Folder permissions (https://marketplace.visualstudio.com/items?itemName=mohdaslamansari.FolderPermissions)
  3. Backup utility (https://marketplace.visualstudio.com/items?itemName=mohdaslamansari.backuputility)

clip_image001


            —–End of Article—–

Microsoft Marketplace Extension – Backup Utility

******Making Automation easy – Plug & Play Plugins********

In many releases, we get requirement to take the backup of all the files and folders of website before performing any updates on them. I have implemented this requirement using PowerShell in TFS. It needs source location from where to take the backup and the destination location where the backup will be placed.

To make it simple and easy to use, I created MS marketplace extension and published the same in the Microsoft marketplace.

It is now available publically to everyone to download and use.

Direct link – https://marketplace.visualstudio.com/items?itemName=mohdaslamansari.backuputility

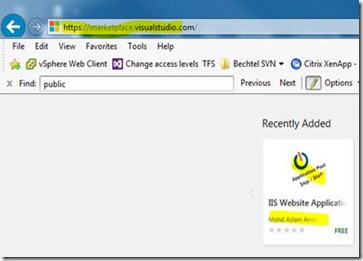
Marketplace link – https://marketplace.visualstudio.com/

I have copied the sourcecode to GitHub for getting code contribution from public.

GitHub link – https://github.com/mdaslamansari/backuputility

clip_image001

clip_image001[4]

Task (UI) in release definition –

clip_image001[6]

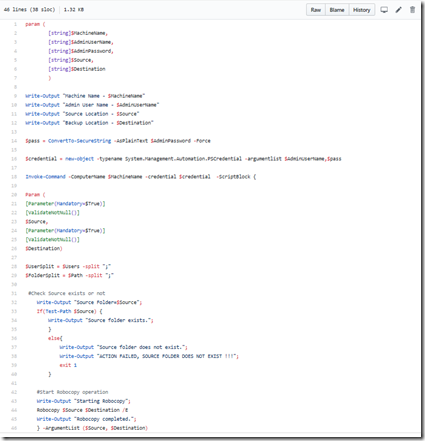
Here is the PowerShell script at its core –

image


    —End of Article—-

My First Release Extension in Microsoft Marketplace

I am extremely happy to share with you that I have published my first release task extension (IIS Website Application Pool Start Stop) to the Microsoft Marketplace. It is now available publically to everyone to download and use as I am now verified published from MS.

Direct link – https://marketplace.visualstudio.com/items?itemName=mohdaslamansari.build-task

Marketplace link – https://marketplace.visualstudio.com/

I have copied the sourcecode to both GitHub for getting code contribution from public.

GitHub link – https://github.com/mdaslamansari/ApplicationPoolStartStop

clip_image001

Technology used –

Front-End (UI) – JSON (Extension manifest and Build task)

Back-End – PowerShell script

clip_image001[5]


Benefits of marketplace extensions –

1. With it, we don’t need to copy PowerShell scripts to each and every team projects. We just need to install extension on Team Collection level and it will be available in the available task list of all the team projects under it and you can then add it to the release definition.

2. By making it public, we have increased its reach and testing scope. People can contribute with code and testing results and it will make plugin robust.

TFS–RM–Website configurations

In TFS Release management automation, we are using “Manage IIS App” plugin to create/configure websites and their application pool.

clip_image002

Many times, depending on the application requirements, we need to do many website based configurations. They are documented below –

Requirement 1 – How to set “Enable 32-bit Application” to true in the application pool using TFS RM automation.

Solution – Using AppCmd.exe, it can be done by adding the below line in the advanced tab of above plugin –

set apppool /apppool.name:"$(WebURL)" /enable32bitapponwin64:true

Once executed successfully, it can be verified using the below screen (Application Pool -> Advanced Settings)

clip_image004

Requirement 2 – Enable/disable the below authentication methods –

1) Disable Anonymous Authentication – Using AppCmd.exe, it can be done by adding the below line in the advanced tab of above plugin –

unlock config /section:AnonymousAuthentication

set config "$(WebURL)" /section:AnonymousAuthentication /enabled:false

Note – $(WebURL) – It is variable for website URL.

2) Disable Basic Authentication – Using AppCmd.exe, it can be done by adding the below line in the advanced tab of above plugin –

unlock config /section:BasicAuthentication

set config "$(WebURL)" /section:BasicAuthentication /enabled:false

Note – $(WebURL) – It is variable for website URL.

3) Enable Windows Authentication – Using AppCmd.exe, it can be done by adding the below line in the advanced tab of above plugin –

unlock config /section:windowsAuthentication

set config "$(WebURL)" /section:windowsAuthentication /enabled:true

Note – $(WebURL) – It is variable for website URL.

Once executed successfully, it can be verified using the below screen (Website -> Authentication)

clip_image006

Requirement 3 – .Net Trust Levels needs to set to “Full”.

Solution –

Using AppCmd.exe, it can be done by adding the below line in the advanced tab of above plugin –

set config /commit:WEBROOT /section:trust /level:Full

Once executed successfully, it can be verified using the below screen (Website -> .Net Trust Levels)

clip_image008

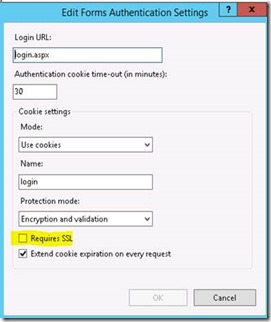
Requirement 4 – Disable required SSL in Forms Authentication.

Solution –

Using AppCmd.exe, it can be done by adding the below line in the advanced tab of above plugin –

set config "$(WebURL)" /section:system.web/authentication /forms.requireSSL:false

Note –

$(WebURL) – It is variable for website URL.

To enable, change the value to true.

Once executed successfully, it can be verified using the below screen (Website -> Authentications -> Forms Authentication -> Edit)

clip_image010

TFS RM–Kill Process before Copy Task

Requirement

We need to copy the application executables and dlls to the XenApp environment or any other environment like Web server using TFS release manager.

Problem

Copying of executable files will fail if it is already in use as a process by some user.

Solution

To copy executable file, we need to ensure that it should not be in use. To ensure it, we need some script that detects it and if the process is running, it should kill it.

Here are the steps that can help to address the issue –

1) PowerShell script to kill the process. Here is the script that will kill the process –

<#
.Synopsis
   Script is to kill notepad* Process.
.DESCRIPTION
   Script is to kill notepad* Process.
#>

#Script Name – KillProcess.ps1
$ProcessName = "notepad*"

$ProcessInfo = get-process | Where-object {$_.ProcessName -Like $ProcessName}
if (@($ProcessInfo).Count -gt 0)
{
    Write-Output "——-Process – $ProcessName —————"
    TASKKILL /F /T /IM $ProcessName
    Write-Output "Process – $ProcessName – killed successfully!" 
    Write-Output "————————————————–" 

}

2) Add this script in TFS application repository.

3) Publish it as an artifact in the application automated build definition so that it will be available for the release automation.

4) In release automation, add below tasks

       a. Task to copy the PowerShell script to the target machine.

       b. Task for “PowerShell on Target Machines”.

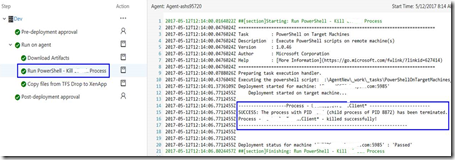
      image

Output –

image


  ——-End of Article—–

Visual Studio 2017 – vNext Build Automation – .vdproj based installer

Problem – We need to build “.vdproj” (installer) based project in Visual Studio 2017 using vNext Build Automation.

Solution

Follow the below steps –

  1. First step is to configure the build environment.
    1. Install “Microsoft Visual Studio 2017 Installer Projects (InstallerProjects.vsix)”. Download it from https://marketplace.visualstudio.com/items?itemName=VisualStudioProductTeam.MicrosoftVisualStudio2017InstallerProjects.
    2. To install it, double clink on InstallerProjects.vsix and follow the default option to complete the installation.
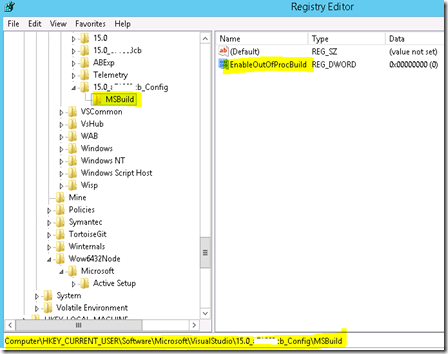
    3. Add the below highlighted key. To add it,
      1. Add the node 15.0_[User ID]_Config like as shown below 15.0_a71083cb_Config.
      2. Add MSBuild folder (key) in it.
      3. In MSBuild, create new key “EnableOutOfProcBuild” and set its value as 0.

          image

  1. In TFS Build Definition, add task for command line and add the below information –
    1. ToolC:\Program Files (x86)\Microsoft Visual Studio\2017\Enterprise\Common7\IDE\devenv.com
    2. Arguments$(Build.SourcesDirectory)\Deployment.sln /build $(BuildConfiguration)
  2. Finally, initiate the build and it will build the “.vdproj” files as defined in the solution and will create MSI installer file.

TFS Drop Location Clean Up Utility in PowerShell

In TFS, we do build Automation and the output of the build Automation is kept in some DFS share called the drop location. When you build the application multiple times using the automated build process, it generates the output and keeps it in the drop location. Let’s say, you have application “abc” and you did build of it ten times. It will copy the output to drop location in different folders like –

[DFS Share]\abc\1.0.0.0

[DFS Share]\abc\1.0.0.1

[DFS Share]\abc\1.0.0.2

….

[DFS Share]\abc\1.0.0.10

In long interval of time, the drop location will hold n number of output folders. Now, think what will happen when we have multiple applications and multiple teams are working on it. It will consume lots of space.

To address this issue, one has to manually manage the drop location. Manual activity is always time consuming and prone to errors.

One has to look for some kind of automation to manage the drop location. Here are the basic requirements –

1.) We need to delete the output folder older then n (say 10 days) number of days.

2.) We need to keep last three output folders even if they are older then n (say 10 days) number of days.

3.) It should send email to the concerned team/person for the notification of the clean-up done.

These two requirements can be easily implemented using PowerShell scripting.

Here is the script content –

Minimum PowerShell version required is v5.

——————————-

   1: <#

   2: .Synopsis

   3:    Script is to delete all the folders with the content from the TFS Drop location which are older then n number of days.

   4: .DESCRIPTION

   5:    Script is to delete all the folders with the content from the TFS Drop location which are older then n number of days.

   6: #>

   7:  

   8: #Updated - First Version

   9:  

  10: $Global:DataForEmailBody

  11:  

  12: Function SendEmail {

  13:  

  14: $Email = New-Object -ComObject "CDO.Message"

  15: $Email.Configuration.Fields.Item("http://schemas.microsoft.com/cdo/configuration/sendusing") = 2

  16: $Email.Configuration.Fields.Item("http://schemas.microsoft.com/cdo/configuration/smtpserver") = 'XXXXX'

  17: $Email.Configuration.Fields.Item("http://schemas.microsoft.com/cdo/configuration/smtpserverport") = 25

  18: $Email.Configuration.Fields.Update()

  19:  

  20: $Email.From="TFSAdmin@xyz.com"

  21: $Email.To="abcd@xyz.com"

  22: $Email.Subject="Utility | Scheduled Job | TFS Drop Location Cleanup Activity"

  23: $Email.HTMLBody = "<font color=""black"" face=""Calibri, Verdana"" size=""3"">

  24:                     <p><b> All, </b></p>

  25:                     <p><mark> fyi....</mark></p>

  26:                     <p><b> </b></p>

  27:                     <p> TFSDropLocationCleanupUtility has cleanup the drop location. Here are the details...</p>

  28:                     <p><b> </b></p>

  29:                     <p>----------------------------------------------</p>

  30:                     <p><b> </b></p>

  31:                     <a> $Global:DataForEmailBody </a>                    

  32:                     <p>----------------------------------------------</p>                                                           

  33:                     <p> Regards, TFS Administration Team </p>

  34:                         <font color=""blue"" face=""Arial, Verdana"" size=""2""

  35:                         <p> This is an auto generated email from the scheduled Job in TFS. If you need more information, contact TFS admin </p>"

  36:  

  37: $Email.Send()

  38: }

  39:  

  40: #Start-Transcript -Path ".\TFSDropLocCleanupUtility.log"

  41: $DayCount = 30 #Folders to be deleted prior to current - this day count

  42:  

  43: $dt = (Get-Date).AddDays(-$DayCount)

  44: $FolderCountsToSkip = 3

  45: $DropLocation = "P:\temp"

  46: $flag = $false

  47:  

  48: $Global:DataForEmailBody = "<p> Batch Started.....</p>"

  49:  

  50: $RootFolder = Get-ChildItem $DropLocation -Directory

  51:  

  52: foreach ($_RootFolder in $RootFolder)

  53: {

  54: #Write-Host $_RootFolder

  55:  

  56:    $FolderFirstLevel = Get-ChildItem $DropLocation\$_RootFolder -directory -recurse -depth 0 | Where-Object {$_.Name -notmatch "^[0-9].(\d+(\.\d+){1,4})"} 

  57:    foreach ($_FolderFirstLevel in $FolderFirstLevel)

  58:     {

  59:        # Write-Host $_FolderFirstLevel.FullName

  60:         

  61:         $FolderInfo = Get-ChildItem $_FolderFirstLevel.FullName | Where{$_.LastWriteTime -lt $dt} | sort { [version]($_.Name -replace '^[0-9].(\d+(\.\d+){1,4})', '$1') } -Descending | Select-Object -skip $FolderCountsToSkip

  62:         foreach ($_FolderInfo in $FolderInfo)

  63:         {

  64:             Write-Host $_FolderInfo.FullName " Deleted!!!"

  65:             Remove-Item $_FolderInfo.FullName -Force -Recurse

  66:             $Global:DataForEmailBody += "<p>" + $_FolderInfo.FullName  + " Deleted!!! </p>"

  67:             $flag = $true

  68:         }

  69:     }

  70:  

  71:  

  72:    $FolderFirstLevel = Get-ChildItem $DropLocation\$_RootFolder -directory -recurse -depth 0 | Where-Object {$_.Name -match "^[0-9].(\d+(\.\d+){1,4})"} | Where{$_.LastWriteTime -lt $dt} | sort { [version]($_.Name -replace '^[0-9].(\d+(\.\d+){1,4})', '$1') } -Descending | Select-Object -skip $FolderCountsToSkip

  73:    foreach ($_FolderFirstLevel in $FolderFirstLevel)

  74:     {

  75:         Write-Host $_FolderFirstLevel.FullName " Deleted!!!"

  76:         Remove-Item $_FolderFirstLevel.FullName -Force -Recurse

  77:         $Global:DataForEmailBody += "<p>" + $_FolderFirstLevel.FullName  + " Deleted!!! </p>"

  78:         $flag = $true

  79:     }

  80: }

  81:  

  82: if($flag)

  83: {

  84:  

  85:     SendEmail 

  86: }

  87: else

  88: {

  89:     $Global:DataForEmailBody += "<p> Drop Location is already upto date. No cleanup required for today!! </p>"

  90:     SendEmail

  91: }

  92:  

  93:  

I have used regular expression for finding the folder name in the drop location. In my case, the folder name is based on version in the format like aa.bb.cc.dd. You need to modify the regular express based on the naming convention in your drop location.

Please note the below screenshot for first two requirements.

clip_image001

Schedule the above PowerShell script to the task scheduler or as a TFS job to run it daily.


clip_image001[4]

On every successful execution, it will cleanup the drop location based on the number of days and number of folders to keep. Finally it will send the email with the information of the folders that it has deleted.

Email Content will be like below –

Case 1 – Folders deleted and clean up done –

Email Content –

All,

fyi….

TFSDropLocationCleanupUtility has cleanup the drop location. Here are the details…

———————————————-

Batch Started…..

P:\temp\abcd\1.0.0.52 DELETED!!!

P:\temp\abcd\1.0.0.51 DELETED!!!

P:\temp\abcd\1.0.0.46 DELETED!!!

P:\temp\abcd\1.0.0.45 DELETED!!!

P:\temp\xyz\1.0.0.69 DELETED!!!

P:\temp\zzzz\Desktop\1.0.0.36 DELETED!!!

P:\temp\zzzz\Desktop\1.0.0.31 DELETED!!!

———————————————-

Regards, TFS Administration Team

This is an auto generated email from the scheduled Job in TFS. If you need more information, contact TFS admin

————————

Case 2 – Drop location is already up to date –

Email Content –

All,

fyi….

TFSDropLocationCleanupUtility has cleanup the drop location. Here are the details…

———————————————-

Batch Started…..

Drop Location is already upto date. No cleanup required for today!!

———————————————-

Regards, TFS Administration Team

This is an auto generated email from the scheduled Job in TFS. If you need more information, contact TFS admin

——End of the Article—-