Terraform – Creating Azure Key Vault with Soft Delete Option

Happy to share with you all my new article on my first terraform script…. | It is indeed infrastructure as a code (IAC).

I wanted to create Azure Key Vault with soft delete option using Terraform. Soft delete option is the recommended practice for key vault as it enables us to recover from any delete operation on the key vault for with in 90 days.

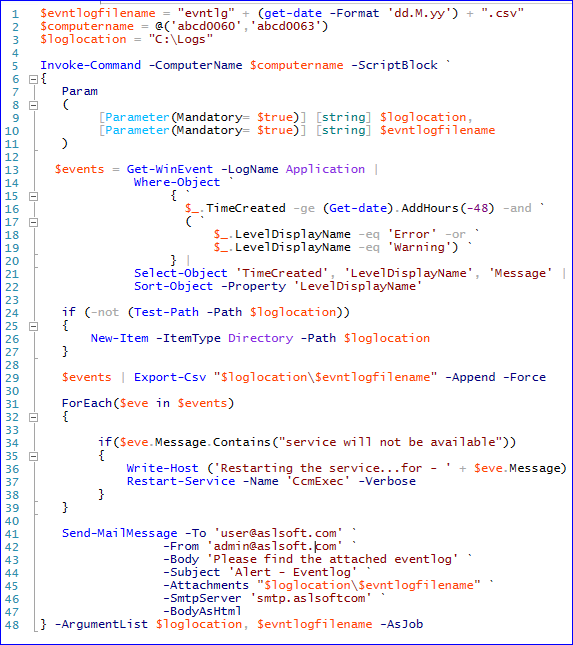
I have copied my code here –

Important note here is that Terraform do not have out of the box command to enable soft delete and so to implement it, I used the “local-exec” option to run the PowerShell command. What it will do is that it will update the created key vault from the steps above it for the soft delete by running the PowerShell command from the local execution.

Code –

Main.tf – Main file that hold all the code that gets executed.

provider “azurerm” {

    alias=“subscription_dev” 

    tenant_id=“[TENANT ID]” 

    subscription_id=“[SUBS ID]” 

    client_id=“[CLIENT ID]”

    client_secret=var.client_secret

}

resource “azurerm_resource_group” “rg” {

  name = var.resourcegroupname

  location = var.location  

  provider = azurerm.subscription_dev

}

resource “azurerm_key_vault” “kvpoc” {

    name=var.kvname

    location=var.location

    resource_group_name=var.resourcegroupname

    tenant_id=var.tenant_id

    enabled_for_deployment=true

    enabled_for_disk_encryption=false

    enabled_for_template_deployment=true

    sku_name=“standard”

    provider = azurerm.subscription_dev

}

resource “null_resource” “kv-soft-delete” {

  provisioner “local-exec” {

         command = “az login –service-principal -u ${var.client_id-p ${var.client_secret–tenant ${var.tenant_id}

  }

  provisioner “local-exec” {

         command = “az resource update –id ${azurerm_key_vault.kvpoc.id–set properties.enableSoftDelete=true”

  }

}


Variables.tf – This file holds all the variables and their values.

variable “location” {

  default=“East US”

}

variable “resourcegroupname” {

  default=“poc”

}

variable “kvname” {

  default“aslsoftkvdemo”

}

variable “tenant_id” {

  default=“[TENANT ID]” 

}

variable “client_secret” {

  default = “[CLIENT SECRET]”

} 

variable “client_id” {

  default=“[CLIENT ID]”

}


To run the above terraform script, run the below commands –

  1. terraform planIt will tell what changes it will do on the infrastructure.
  2. terraform apply
    – It will implement the infrastructure changes.

I have added below screenshot to show it has implemented soft delete option.

–End of the Article–

Azure – Service Health Alert

First of all, my apologies for not writing for a long time. I will now write regularly.

Recently, I got one learning which I feel is important to share…

I deployed an application in Azure which had many app services, cognitive service and storage accounts. It was deployed successfully. Next day, it stopped working and I was curious what could have gone wrong that stopped the application from working fine. I did some troubleshooting and found every setting as present in accordance as required by the application. I restarted app services and still got same results.

Finally, I went to the tab “Support + troubleshooting” and selected “Resource Health” as shown below –

On the resource health blade, I found the information that the service is currently unavailable and MS engineers are looking into it. You can explore more details on this page and even contact support from it. Had I got some kind of notification for this information, It would have saved time that I spent of the investigation and would have pro-actively informed the user/developer/customer about it.

Now, question is, what should be done to mitigate such issues –

  1. Whenever you are selecting the instance of service or its sku, please note the SLA as given by MS. Many times, MS says they give 99.9 % uptime only when you select at least two instances of the service. It is very important to note it and plan the capacity very carefully.
  2. Add a service health alert.

To add the service health alert –

  1. Search for “Service Health” service and click it. Below screen will appear –


  2. You can explore this screen to get good overview of the service health in Azure.
  3. Click on “Add service health alert”. Below screen will appear:

    You need to select Subscription, services that you want the health updates for and the region where you have deployed your application.

  4. Event type as be any as shown below:

  5. After selecting above mandatory information, create or select the existing action group. This group defines the action that you want to take as soon as the alert is generated. The important field in it is the action type as shown below:

    You can select Email/SMS/Push/Voice or any other as shown above to cater your requirements.

  6. Once it is created/selected, complete the other requirements to add the alert. Depending on the action types you defined, you will get the notifications.

    ——End of the Article——

My First Webinar – Azure Key Vault

Yesterday, I gave my first webinar. Let me share you my experience….

I was excited as well nervous as it was my first global kind of webinar. One thing I would like to share you is that the person who learned most out of this webinar is me!

I would urge everyone to share your learning to the global IT family. This will not only help all getting knowledge uplifting but at the same time you will also learn and will get confidence and self-satisfaction.

#TogetherWeWillGrow

#SharingIsCaring

#LearningAndSharing

Here are the artifacts of the webinar –

Presentation –

Link to Webinar – https://youtu.be/EzjqNFJ0Vk0

I am planning for more webinars… Stay tuned!!

—–End of the Article—-

Secure DevOps Kit for Azure

“Secure DevOps Kit for Azure”, also known as AzSK, is the collection of scrips, tools, extensions etc. to cater the security needs of the Azure subscription and/or to the security of the various azure service instances used by our applications.

How it works is that Microsoft has defined the security best practices/recommendations for the Azure services/resources and when you run this kit, it finds if the resource/subscription under investigation has security best practices implemented or not. Based on the finding, it generates a report and actions needed can be taken to tighten the security.

Its control coverage till date –

Note – Its coverage will increase day by day and so please refer to MS documentation for the latest list.

I have implemented it in two ways –

  1. PowerShell Scripting
  2. Integrated Azsk with release pipeline of the Azure DevOps service

Let me explain above options in detail –

PowerShell Scripting Way –

We can use PowerShell scripting to run the secure DevOps kit manually to understand the security posture of the various services we are using in the development of the applications. It will give us good health report and we can act according to the findings. Once the action has been implemented, we can again run the script to find if the implementation is successful or not.

To start, Follow the below steps:

  • We need to first install the “Azsk” PowerShell Module using the below command –

    Install-Module Azsk -Scope CurrentUser -AllowClobber -Force

    It will install Azsk module on the machine where it is run.

  • Login to Azure using the command – Login-AzAccount

Now you are ready to use various PowerShell Cmdlets as provided by the above module.

To get the list of available Cmdlets, run the command – Get-Command *AzSK* | ogv

Output –

We can now use the above Cmdlets in our PS script to find the security posture of the various services we are using.

Just to find the sample report, I ran the below command for Azure Services for the given resource group–

Get-AzSKAzureServicesSecurityStatus -SubscriptionId xxxxxx-xxxxxx-xxxxxx-xxxxxxxx -ResourceGroupNames RG -GeneratePDF Portrait

Input of the above command –

  1. SubscriptionID – It is subscription ID of the subscription that you want to investigate. You can find it from Azure Portal or by running the command – Get-AzSubscription.
  2. ResourceGroupName – Resource Group Name
  3. GeneratePDF – To generate the report in PDF

    It has many more input parameters like resource name and resource type. Best way is to refer the help of the Cmdlet to get the detailed list of parameters.

I also ran the below command for the subscription security state. Subscription owner can use below command to check the overall security health of the subscription.

Get-AzSKSubscriptionSecurityStatus -SubscriptionId xxxxxxxx-xxxxxxx-xxxxxxx-xxxxxxxx -GeneratePDF Portrait

Important Note –

For Automation using PS, instead of using the Azure Login command, we can use the concept of application registration in Azure AD and defined required permission on the service principal.

Integrated Azsk with release pipeline of the Azure DevOps service –

One of the most interesting use-case of Azsk is to have its integration with our release pipeline using either TFS or Azure DevOps, so that we can get the security posture while we are in the pipeline and then take the required actions. We can mandate that the scan should pass before proceeding to the next level of the release.

One cool thing is that it can forward all the scan findings in the release process to Azure Log Analytics and then based on the data, alerts/runbooks can be implemented. I have implemented basic alert of sending email in case a failed test is reported.

To implement it, follow the below steps –

  1. Create account in the Azure DevOps.
  2. Browse to the Marketplace at https://marketplace.visualstudio.com/items?itemName=azsdktm.AzSDK-task&targetId=5da5c87c-0ec5-4c66-8f2d-2b6c9cdfb7cf&utm_source=vstsproduct&utm_medium=ExtHubManageList and install “Secure DevOps Kit (AzSK) CICD Extensions for Azure” on the account created in step (a) above.
  3. Now create the release definition and add Azsk tasks. To do so, click on the “+” sign and search “azsk”, it will show below available task, add the one required –

  4. Created Release definition will look like –

    Below steps needs to be implemented to configure Azsk_SVTs task in the release pipeline –

    1. If you are subscription owner, then select the subscription under “AzureRM Subscription” dropdown or click on the Manage link just after it and it will navigate you to the below screen –

      1. Select the Scope level and the subscription that you want to scan.
      2. You can optionally select the resource group just to target it.
      3. Check the checkbox “Allow all pipelines to use this connection”.
      4. Finally, it will create the service principal in Azure AD and will assign the “Contributor” role.


    2. Subscription ID – Id of the subscription hosting the resources against which Security Verification Tests (SVTs) should be run.


    3. For OMS logging –
      1. Select the checkbox “Enable OMS Logging”.
      2. Go to the Azure Portal and create Log Analytics workspace or ask Azure Admin to create one for you and share the below information as shown in below screenshot –
        1. OMSSharedKey
        2. OMSWorkspaceID

        In Azure Portal, go to Log Analytics workspace blade > Advanced settings and then select the highlighted values.

      3. Now in Azure DevOps Release definition, either create a variable or create the variable groups under Library and link them to the release definition.

        Note – Keep the variable name same as in the below screenshot. It is the requirement of the Azsk task.

    Below steps needs to be implemented to configure AzSK_ARMTemplateChecker task in the release pipeline to verify the ARM template for implementing various services in Azure (Infrastructure as a Service) –

    1. Browse to the ARM template file or the folder where ARM templates are created. In Azure DevOps, it will be in the published build artifacts.
    2. If you have defined the parameter file for ARM template, then browse it under “Parameter file Path or Folder Path”.

    One the release definition is configured correctly, create new release to test the execution of above two Azsk tasks.

     Results of my sample run –

  1. AzSK_ARMTemplateChecker task –

  2. AzSK_SVTs –

    You can download all the logs from the release output as well as shown below –

    Now go to Azure Portal > Log Analytics Workspace > Logs and enter the below query to get the logs pushed to it by the Azure DevOps –

    AzSK_CL

    | where ActualVerificationResult_s == “Failed”

    Based on the above query, I have created Alert that send email to me whenever it gets 1 or more error in the workspace. Below actions can be configured for taking automated actions for the findings –

    —End of Article—

Azure AD Privileged Identity Management – Access Review Feature

In any environment, Cloud or On-Prem, we need some privileged accounts that can be used to manage the environment and so they are very critical to the business. Compromising such accounts could lead to huge damage by the bad actors if they gain access to the environment using such accounts. They can use the victim’s privileged roles to perform the activities for their gain. These accounts must be protected all the times.

Most recommended way is to enable MFA (Multi Factor Authentication) on such accounts which will challenge user to have second level of authentication such as via mobile App (Ex. Microsoft Authenticator). It will be very hard for such accounts to be compromised.

Defense in Depth…

One level of defense is MFA as discussed above. Now second level of defense is to follow the principle of least privileges. By this I mean, why one need to have privileged access all the time. They might need the privileged access for few hours in few days and having such access all the time will put them on huge risk in case the account gets compromised.

To address such risk, Azure AD Privileged Identity Management introduced the concept of Eligible membership. If a user is eligible for a particular role, user can activate that role for a particular duration with proper justifications. Once activated, user will get the privileged access and can now perform the activity. Once the access is no longer needed, user can de-active it or it can be de-activated after the activation time is expired. Activation cycle can be workflow based or self-approval based.

With MFA + PIM roles we can put good level of defense in the environment.

Now, in the real scenarios, user roles gets changed as they move from one department to another or one role to another, we have to ensure that their privileged access should be revoked accordingly. They might not need the access anymore. As we believes in the principle of least privilege, any extra rights can be risky and so the user rights needs to be reviewed regularly. It will be important in audit process as well.

To address it, Azure AD PIM has the feature called “Access Review”, which can be used to initiate review process of one or more privilege roles. It will send notification (email as well as notification in Portal) to the members of that particular role to give justification if they still needs the access. Users can give justification and approve it or deny it to confirm that they don’t need it anymore, role can be revoked automatically depending on the access request settings.

To create Access Request –

  1. Go to Azure Portal (https://portal.azure.com)
  2. Navigate to Privileged Identity Management Service
  3. Under Manage section, select Azure AD roles
  4. In Azure AD roles screen, under Manage section, select Access reviews, following screen will appear –

Fill the above screen with the required data. Please note the frequency, Duration, role membership and reviewer fields.

Under “Upon completions settings”, enable auto apply results to resource. It will disable the role automatically if user clicks on the deny button.

Finally, click on Start button.

On successful creation, it will be shown as –

With it done, it must have send email to all the members of the role and a notification to all members in the Azure portal under PIM as well.

Important Note –

Generally, every organization have separate nomenclature of the privileged accounts which is different from the regular account. For example, regular account of user can be sam@xyz.onmicrosoft.com and his privileged account can be pr-sam@xyz.onmicrosoft.com. In this can, since both the accounts are different, email notification will only go to pr-sam@xyz.onmicrosoft.com as it is the privilege account and under review process and not to his usual mailbox and so he/she may not be able to get the notifications. To get the notification on the regular account mailbox, always set “Alternate email” of the privilege account to the email ID of the regular account. This way user will get the email notification as shown below –

User needs to click on the Start review button and it will navigate user to Azure Portal for the approve or deny.

Also, User can directly go to the Azure Portal > Azure AD Privileged Identity Management > Review Access (under Tasks) as shown below to approve or deny the request.

User then needs to click on above highlighted row.

Administrator/initiator can view the Progress of review process from Dashboard > Privileged Identity Management > Azure AD roles – Access Reviews > [Role Name] as shown below –

Please note that above process can only be implemented currently using Azure Portal. There are no PowerShell Cmdlets available to automate it but may be available in future.

——–End of the Article—–

Azure Key Vault – Visual Studio (ASP.Net Website)

In my last article, I demonstrated that we can have all the sensitive information kept in Azure Key Vault and then it can be accessed from the application. Application do not need to keep sensitive information like database connection string, storage keys etc in config files, instead they can fetch it from key vault at runtime. This will help us achieving the security goal which is of the paramount importance.

Here in this article, I have implemented the below architecture.

Let me explain the above architecture –

  1. First step is to create an Azure SQL database. It can be created and configured (like firewall settings) using the PowerShell script as I wrote in my last article or can be directly done using Azure Portal. Once the database is created and configured, get its connections string.
  2. Next step is to create Azure Key vault and add a secret for the given database connection sting. Once done, get the Secret Identifier (dbConnectionSecretURI) from key vault.

  3. Now create a web application in Azure App services. Again, it can be done using PowerShell, CLI or the Portal. Please refer to these articles for more details – https://mdaslam.wordpress.com/2018/09/03/microsoft-azure-app-services-powershell-arm-vsts-cicd/ and https://mdaslam.wordpress.com/2018/08/28/microsoft-azure-app-services-simple-web-app/
  4. Once the web application is created, next important step is to do application registration in Azure Active Directory. For it, go to the Azure Active Directory tab and select “App Registrations” as shown below –

  5. Once the application is registered, below screen will appear –

    Please note the Application ID from the above screen.

  6. Click on the Settings link in the above screen. Below screen will appear, select “Keys” tab.

  7. Enter description and expires duration in the below screen and click on save. Once saved, client secret key will be generated. Copy this key right away as once you leave this blade, you cannot retrieve it again, you have to create the new one instead.

  8. Once application is registered in AAD, we need to define the access policies in the Azure key vault. Once defined, Azure key vault can now authenticate and authorize the application access request to read the secrets.
  9. Till this step, you got the following values that will be needed in .Net application to access the key vault –
    1. Client ID (Application ID)
    2. Client Secret
    3. DBConnectionSecretURI
  10. Above values at step 8 needs to be added to the application config file, say web.config in our case as –

  11. Developer can write code in any language say .Net or Java or whatever needed. Developer can then publish the code to Azure and test the application for the database access.
  12. I have written ASP.Net code in Visual Studio 2017 and implemented above architecture. Please note that I have used below two NuGet packages that needs to be added to the project –
    1. Microsoft.Azure.KeyVault
    2. Microsoft.IdentityModel.Clients.ActiveDirectory
  13.  

    ——End of Article—–

Azure Key Vault – PowerShell Example

In any application architecture, application talks to many other components like database, Redis Cache, Azure Storage etc. To talk to these components, they store sensitive information in the config file.

Sensitive information can be like –

  • database or Redis Cache connection string which has information about database, database server, User Name and Password.
  • Azure blob storage connection string that has storage key
  • Etc.

If any of the above sensitive information is compromised, it can open application surface for attackers. For example, with database connection string, attacker can easily login into the database and query it to get the information. If storage key is compromised, person having key will have full access to that storage. We must ensure that all such information should be kept in extremely secure environment.

Microsoft Azure Key Vault is the solution to the above challenge. From Microsoft documentation, Azure Key Vault is a tool for securely storing and accessing secrets. A secret is anything that you want to tightly control access to, such as API keys, passwords, or certificates. A Vault is logical group of secrets. 

I wrote below PowerShell to demonstrate the use of Key Vault. Here is the flow of the below script –

  1. You need to first login into the azure account.
  2. Select the subscription where you want to create all the resources.
  3. Create Azure Resource Group if it is already not created.
  4. Create Azure SQL Database. To do so, first step is to create SQL Server and then SQL Database on it.
  5. Create firewall rules on the SQL Server to allow requests from the range of IP address or from any Azure IP Addresses.
  6. Once the database is created, grab the connection string from it. Replace the user name and password with the one you created while running the below script.

  7. Now create the Azure Key Vault and add the above database connection string as a secret to the azure key vault. I added the connection string in the below script just to demonstrate how to add it to the key vault using PowerShell. Once added, we can remove these steps from the script.
  8. Finally, we are reading the connection string (secret) from the Azure key vault to connect to the Azure SQL Database without storing the connection string in the program. After successful connection, we have created a table and inserted a row in it. Once done, we have closed the connection.

With it, we don’t need to add connection string anywhere in the program. We can get it directly from key vault whenever we need it. It thus makes it secure.

There is one more perspective, for example, in case of storage keys, it is recommended to change them periodically so that no one can break or guess it. If we store it in the config file, every time, key needs to be changed, we need to update the application config file. If we keep the keys in Azure key vault and referring it from there, we just need to update the key vault secret and no application change will be required.

Here is the PowerShell Script Screenshot. Code is kept at https://github.com/mdaslamansari/azurekeyvault-powershellexample

In the next article, I will use Visual Studio and ASP.Net application to demonstrate it, so stay tuned!

–End of the Article—

Application Log Monitoring

In the multi-server (multi-cluster) environment on-premise or on cloud, there is always requirement to monitor it for any issues encountered or about to come.

In a SAAS environment, we never wanted any downtime because of any issue with the application or with the server environment. We need to have some monitoring system in-place to monitor the health of application as well as servers on which it is hosted. Monitoring system will not only help in pro-active prevention of any upcoming issue/s or doing troubleshooting when application faces issue/s, it also helps us in monitoring the security of the application. For example, if some unauthorized person tries to get hold of the application, application will write this access request with details like person ID, IP address and time of access to the log. One can then investigate it and pro-actively acts on it.

Logs generated by application can be written in the eventlog or anywhere in the application specific log file.

There are many ways to monitor the logs. It not only requires the capturing of log data from eventlog or any other source, it also requires strong analytics tool to produce sensible information from the log files. Note that we can have Gigs/TBs of log data. Manually, it will be very difficult to analyze it.

Here in this article, I have discussed about two approaches –

  1. Automating it using PowerShell.
  2. Using industry standard tools like SPLUNK.


Let’s discuss both approaches here –

Automation using PowerShell –

Application is writing logs in the eventlog. Approach will be to write a PowerShell script that will read the eventlog for any error or warning messages regularly and will then either take some action like restarting a service or just send the email with log as attachment to the application administrator.

Here is the script that can be used for the same –


In the above PowerShell, I have used “Get-WinEvent” cmdlet (Gets events from event logs and event tracing log files on local and remote computers.). I added filters to get the “error” and “warning” data for the last 48 hours. It is taking the below actions –

  1. It is analyzing each row to find some specific keywords and based on it is taking some action. In the above script it is restarting a windows service.
  2. It is exporting the data into csv file and sending it as attachment to the application administrator using “Send-MailMessage” cmdlet.


We can now add this PowerShell script to the Windows scheduler to run it regularly. Above script will run as a job and you can get its status using the cmdlet ‘Get-Job’.

Automation using tools like SPLUNK –

Suppose we have n number of servers (say 15) in cluster on which we have deployed the application. Application will be running on all these servers using load balancer. While application is running on these servers, it or web server may encounter some issues. How to troubleshoot these issues efficiently? We may use PowerShell way as discussed above but it needs complex script to visualize data out of tons of logs generated. Tools like SPLUNK provides automated ways to collect the log data from all the server in real time and can be queried and visualized using its analytics.

Splunk have many components that needs to be setup for making it work. One of the important component is “forwarder” which needs to be installed on all the servers. This part can easily be done using SCCM based deployment. It has the indexer that will index the data for efficient querying of the data.

Now suppose an event has been triggered in 3 of the servers in cluster and application/system administrators are not aware of. Splunk will get the logs and analyze the collected logs for different keywords using the defined queries. It will then send the alert to administrators using email. With it you will be able to proactively address any upcoming issues.

One more good example is, suppose the InfoSec (Information security) team has mandated the requirement that only special type of user accounts should be added to the servers. Suppose someone added user account which is not supposed to be added in the server. As soon as it is added, system will add a log in the log about the addition of user in the administrator group. Splunk will collect that log and the predefined query will run and immediately it will find the non-compliance and will send the email notification to the Infosec team.

—–End of Article—-

Microsoft Azure – App Services – PowerShell | ARM – VSTS (CICD)

In my last article (https://mdaslam.wordpress.com/2018/08/28/microsoft-azure-app-services-simple-web-app/), I discussed about how to create Web App using Azure’s App Service offering manually. Here in this article, I have used automation to achieve the same goal.

It is divided into two parts –

  1. Automation of the creation of Resource Group, App Service plan and Web App in Azure. I used both PowerShell based, and ARM template based. I created ARM template using Visual Studio. Visual Studio have made it easy to write and understand.
  2. CI/CD for the Web App deployment using VSTS.

All the files and folders are kept in VSTS based team project.

It is Infrastructure as code (IAC). How interesting it is indeed!

Let’s first discuss the first part of the automation –

  1. Using PowerShell Script –


Here is the script and comments are already added with the code that will make it easy to understand.


#Variable Group

$VMLocation
=“EastUS”

$ResourceGrpName=“MyLearning”

$WebAppName
=“MyAwesomeAppAslSoft”

$AppServicePlanName
=“MyLearningAppServicePlan”


#Logic

#Create Resource Group

New-AzureRmResourceGroup
-Name
$ResourceGrpName
-Location
$VMLocation
-Verbose
-force


#Create App Service Plan

$AppServicePlan
=
New-AzureRmAppServicePlan
-Location
$VMLocation
-Tier
Free
-Name
$AppServicePlanName
-ResourceGroupName
$ResourceGrpName
-Verbose


$webapp
=
Get-AzureRmWebApp
-ResourceGroupName
$ResourceGrpName


if($webapp.Name -eq $WebAppName)

{


#Delete Web App


Remove-AzureRmWebApp
-Name
$WebAppName
-ResourceGroupName
$ResourceGrpName
-Force

}

#Create Web App

New-AzureRmWebApp
-Name
$WebAppName
-ResourceGroupName
$ResourceGrpName
-AppServicePlan
$AppServicePlan.Name -Location $VMLocation
-Verbose


  1. ARM template creation using Visual Studio 2017 –

To create ARM template, launch Visual Studio 2017 and select New > Project. Select “Azure Resource Group” option as shown below –


You can start with Blank template and later add the required resource. I have selected “Web App”. Click Ok.


It will create project with both template and parameter JSONs along with PowerShell script to execute it.

I have updated the JSON files as per the requirement and its content is given below –


Code of WebSite.json –

{


“$schema”: https://schema.management.azure.com/schemas/2015-01-01/deploymentTemplate.json#”,


“contentVersion”: “1.0.0.0”,


“parameters”: {


“hostingPlanName”: {


“type”: “string”,


“minLength”: 1

},


“skuName”: {


“type”: “string”,


“defaultValue”: “B1”,


“allowedValues”: [


“F1”,


“D1”,


“B1”,


“B2”,


“B3”,


“S1”,


“S2”,


“S3”,


“P1”,


“P2”,


“P3”,


“P4”

],


“metadata”: {


“description”: “Describes plan’s pricing tier and capacity. Check details at https://azure.microsoft.com/en-us/pricing/details/app-service/”

}

},


“skuCapacity”: {


“type”: “int”,


“defaultValue”: 1,


“minValue”: 1,


“metadata”: {


“description”: “Describes plan’s instance count”

}

}

},


“variables”: {


“webSiteName”: “[concat(‘webSite’, uniqueString(resourceGroup().id))]”

},


“resources”: [

{


“apiVersion”: “2015-08-01”,


“name”: “[parameters(‘hostingPlanName’)]”,


“type”: “Microsoft.Web/serverfarms”,


“location”: “[resourceGroup().location]”,


“tags”: {


“displayName”: “HostingPlan”

},


“sku”: {


“name”: “[parameters(‘skuName’)]”,


“capacity”: “[parameters(‘skuCapacity’)]”

},


“properties”: {


“name”: “[parameters(‘hostingPlanName’)]”

}

},

{


“apiVersion”: “2015-08-01”,


“name”: “[variables(‘webSiteName’)]”,


“type”: “Microsoft.Web/sites”,


“location”: “[resourceGroup().location]”,


“tags”: {


“[concat(‘hidden-related:’, resourceGroup().id, ‘/providers/Microsoft.Web/serverfarms/’, parameters(‘hostingPlanName’))]”: “Resource”,


“displayName”: “Website”

},


“dependsOn”: [


“[resourceId(‘Microsoft.Web/serverfarms/’, parameters(‘hostingPlanName’))]”

],


“properties”: {


“name”: “[variables(‘webSiteName’)]”,


“serverFarmId”: “[resourceId(‘Microsoft.Web/serverfarms’, parameters(‘hostingPlanName’))]”

}

}

],


“outputs”: {


“URL”: {


“type”: “string”,


“value”: “[concat(variables(‘webSiteName’),’.azurewebsites.net’)]”

}

}

}

Code of WebSite.parameters.json Parameter file

{


“$schema”: https://schema.management.azure.com/schemas/2015-01-01/deploymentParameters.json#”,


“contentVersion”: “1.0.0.0”,


“parameters”: {


“hostingPlanName”: {


“value”: “myhostingplan”

},


“skuName”: {


“value”: “F1”

},


“skuCapacity”: {


“value”: 1

}

}

}

PowerShell Command to run it –

New-AzureRmResourceGroupDeployment
-Name
“MyDeployment”
-ResourceGroupName
$ResourceGrpName
-TemplateFile
“C:\Users\maansari\source\repos\AzureResourceGroup1\AzureResourceGroup1\WebSite.json”
-TemplateParameterFile
“C:\Users\maansari\source\repos\AzureResourceGroup1\AzureResourceGroup1\WebSite.parameters.json”
-Verbose
-Force


Output –


Second part of Automation is to implement CI/CD –

I used Microsoft VSTS to store all the files (ARM Templates, Source Code of Website etc). Flow of this part of automation is as follows –

  1. Automation will use ARM template to create Web Application and App service plan.
  2. Automation will build and deploy the build output to the website created in step 1 above.

In VSTS, I have created build template that will build the web application and will publish the output as well as ARM template that will be used as input by the release automation.

Build Definition –


I then created release automation in VSTS which has two tasks. First one is to implement step 1 above and second one to implement step 2 above.

Release Definition –


I enabled CI/CD. This means that as soon as check-in is completed into VSTS source control, build will be fired automatically (CI) and as soon as build is completed, deployment will be triggered automatically (CD).

Release output –

In Azure Portal, below resource are created automatically under the resource group that you have selected in ARM template.

Browse the website and see your changes.


——-End of Article———-

Microsoft Azure – App Services – Simple Web App

Azure App Services is Microsoft’s PAAS (Platform as a Service) offering. It brings together everything you need to create websites, mobile backends, and web APIs for any platform or device.

Here I have tried to demonstrate how to create web app using Azure App Services offering and how to create and deploy Visual Studio based ASP.Net MVC project.

First of all log into the Azure Portal. Once you are logged in successfully, look for “App Services”. Click on “App Services”. It will open new blade with all the available web options –

image

Click Add and then select Web App…

image

Following screen will appear. Click on Create to initiate the creation of the Web App in Azure App Services.

image

Following screen will appear –

Enter all the required details –

App Name – a unique web application name

Subscription – Select your subscription

Resource Group – Select the existing or create the new one.

OS – Select Windows for Windows based websites | LINUX for LINUX based web apps | Docker for containers. I have selected Windows for this article. I will publish another article for Docker based Web App.

App Service Plan – This is extremely important input. App Service plan is container for the web application and it determine the location, features, cost and compute resources required. Select the one that suites best to you as shown below –

Note – My recommendation on selecting the App service plan is to start with the free shared plan for your POC and then go for paid shared plan to add custom domain. As the application becomes ready for production go for the basic plan and then based on the requirement, get the higher plans (standard/Premium) like if you want to scale up/out and want to have SSL or high storage requirements. Its reverse is also valid as if the need of computing or storage goes down, select lower plan to save the cost.

image image

More information on App Service Plan is available on the below MS articles –

https://azure.microsoft.com/en-us/pricing/details/app-service/plans/ 

https://azure.microsoft.com/en-us/pricing/details/app-service/windows/ 

Click Create at the above screen. It will take some time to create Azure App service based web application. Once created successfully, you can find it under App Services screen.

image

Click on the newly created web app…Below screen will appear and you can get all the essential details on it. You can find the URL from it as shown in highlighted text below. Please note that this URL is created by Azure using its own defined DNS. You can use your own custom domain to name it as per your requirement. Custom domain feature started with paid shared plan.

image

Click on the above URL and it will launch the web Application you created in Azure App Services.

image

Now, we need to create Web Application and deploy it in the newly created Web App. I selected Visual Studio 2017 to create very basic ASP.Net MVC based application using the below steps –

Open the Visual Studio 2017 and created ASP.NET Web Application MVC based application.

clip_image002

Click Ok.

clip_image004

Click Ok.

clip_image006

It will take some time and will create the project in VS.

From here, you as developer will write the code and do your internal builds and tests. You now wants to publish the output to the Web App you created in Azure App Services. There are many ways. You can use VSTS/TFS to implement CI/CD to automatically build and deploy the code. You can use FTP with the details as provided the screen below. You can also publish the web application directly from the Visual studio using publish profile. For this article, I selected the publish option directly from VS. I will write another article for VSTS based CI/CD.

To publish application to Azure directly from VS, I first downloaded “Publish Profile” from Web App published in Azure from the below screen. This screen comes when you click on web application from the App Services window.

clip_image008

Now in VS project solution explorer, right click on the project and select “Publish” option –

clip_image010

In the below “Pick the publish target” screen, select the “Import profiles” option to import the publish profile you downloaded above. Click on publish. It will compile the code and will publish output to Azure Web App. You don’t need to import it again unless you reset the profile and download again.

clip_image012

Once published successfully, application’s published code has reached to the cloud and you can now browse the application to view your changes.

clip_image014

   —-End of Article—