XenApp: How to add and run VBScript in Streaming package

Streaming is the virtualization technique. It enables applications to be delivered to client devices and run in a protected, virtual environment.  Applications are managed in a centralized Application Hub, but are streamed to the client device and run in an isolation environment.  Applications become an on-demand service that is always available and up-to-date.

Streaming package needs to be created using the Streaming profiler. Once created successfully, it needs to be published for the user community.

Its creation is explained in my article at https://mdaslam.wordpress.com/2010/08/18/xenapp-application-streaming-package-creation

Now in this article, we will learn:

  1. How to add VBScript in streaming package : Sometimes we need to add VBScript to the package for doing some required operations like mapping of drives. 
  2. How to run the added VBScript: We need to run the VBScript before launching the application. Application launch instruction should be written in the VBScript. 

For implementing above requirement, I will use streaming package for MS Word component that we created in my article at the above link.

Steps to Update streaming package:

  1. Streaming package is modified using Streaming Profiler. To run streaming profiler go to {All Programs > Citrix > Streaming Profiler} and click on Streaming Profiler. Following screen will appear:image
  2. Click on “Open Profile” button, following screen will appear: Select the application streaming package profile file and click Open.image
  3. Following screen will appear:image
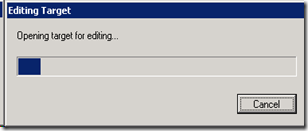
  4. Expand the package {MSOffice – Word} node and right click on first child node and select “Update / Install Application as shown below:image  Following progress screen will appear: It will take couple of minutes to open package for editing.image
  5. Following screen will appear: Click Nextimage   
  6.   Select radio button for “Advanced Install” and click Next. Note: image
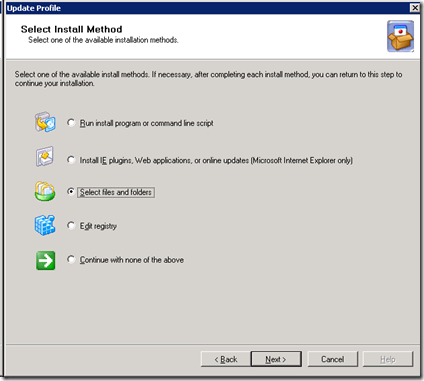
  7. For first requirement {adding VBScript} Select the radio button for “Select files and folders” and Click Next.              image  Following screen will appear:  Select the required file from left hand side window and select the required destination location from right hand window. Once selected, click on arrow button to add the file. Once added, Click Next.                                      Note: We need to add wscript.exe along with VBScript on same location as it will be required to run the script. image Following screen will appear: Select radio button for “Finish  installations”. Click Next.image
  8. Below screen will appear, containing the list of applications that are installed on this package. You can select application from this list and click on “Run” button to run that application. Some application requires some settings to be done after launching it for the first time. Those type of activities can be done using this screen.image 
  9. Once the application is executed in above step for the first time, exit the application and its status will be changed to “Application Run” as shown below: image
  10. If you want to add/modify/delete any application, use the below screen: image Click Add {for above second requirement}, following screen will appear:                                                                                     Add the following information:                                              Application name: MSOffice – Word                                          Version: 2003                                                                        Path: C:\Program Files\Microsoft Office\wscript.exe {Browse to this location by clicking Browse button. Browse button will take you inside package to get the file that you have added above}. Working Directory: C:\Program Files\Microsoft Office.              Command line parameters: testWord.vbsimage  After clicking ok, following screen will appear: Click Next.image
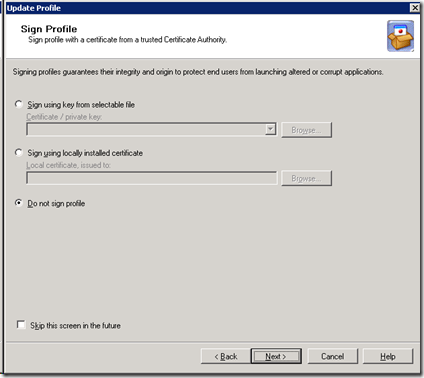
  11. You can sign the profile using below screen: Click Nextimage
  12. Profile summary will appear in the below screen. Click Finish to finish the profile creation.image
  13. On successful updation of profile, following main screen will appear. Click on the save button as shown in circle in below screenshot to save the profile: Profile will saved under the same shared location.image
  14. Now during its publishing in XenApp, we need to select “MSOffice – Word” as application name under “Location” screen as shown below: image  For information of how to publish streaming package, refer to below articles:  https://mdaslam.wordpress.com/2010/08/25/xenapp-publishing-streaming-package/ and https://mdaslam.wordpress.com/2010/09/01/xenapp-automated-streaming-package-publish-using-powershell/ 

XenApp: How to modify Streaming package?

Streaming is the virtualization technique. It enables applications to be delivered to client devices and run in a protected, virtual environment.  Applications are managed in a centralized Application Hub, but are streamed to the client device and run in an isolation environment.  Applications become an on-demand service that is always available and up-to-date.

Streaming package needs to be created using the Streaming profiler. Once created successfully, it needs to be published for the user community.

Its creation is explained in my article at https://mdaslam.wordpress.com/2010/08/18/xenapp-application-streaming-package-creation

Now in this article, we will learn, how to modify streaming package for

  1. adding one file : Sometimes we need to add/update application configuration file
  2. updating registry: Sometimes we need to update registry entry for application data

For implementing above requirement, I will use streaming package for MS Word component that we created in my article at the above link.

Steps to Update streaming package:

  1. Streaming package is modified using Streaming Profiler. To run streaming profiler go to {All Programs > Citrix > Streaming Profiler} and click on Streaming Profiler. Following screen will appear:image
  2. Click on “Open Profile” button, following screen will appear: Select the application streaming package profile file and click Open.image
  3. Following screen will appear:image
  4. Expand the package {MSOffice – Word} node and right click on first child node and select “Update / Install Application as shown below:image  Following progress screen will appear: It will take couple of minutes to open package for editing.image
  5. Following screen will appear: Click Nextimage  
  6.   Select radio button for “Advanced Install” and click Next. Note: image
  7. For first requirement {adding one file} Select the radio button for “Select files and folders” and Click Next.              image  Following screen will appear:  Select the required file from left hand side window and select the required destination location from right hand window. Once selected, click on arrow button to add the file. Click Next.image Following screen will appear: Select radio button for “perform additional installations” to implement second requirement. Click Next.image
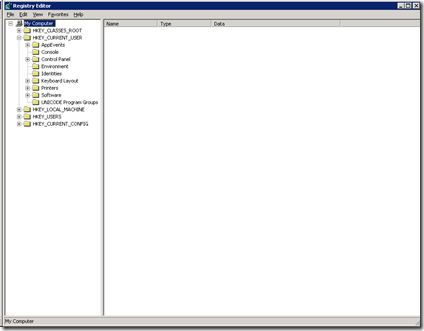
  8. For second requirement {updating registry} Select the radio button for “Edit registry” and Click Next. image  Following screen will appear:  Click on “Lunch Windows Registry Editor” button:image Registry editor will be launched as shown below: Update it for the required data and then close the editor. image Following screen will appear again: Click Nextimage
  9. Following screen will appear: Select radio button for “Finish installations” and Click Next.image              
  10. Below screen will appear, containing the list of applications that are installed on this package. You can select application from this list and click on “Run” button to run that application. Some application requires some settings to be done after launching it for the first time. Those type of activities can be done using this screen.image
  11. Once the application is executed in above step for the first time, exit the application and its status will be changed to “Application Run” as shown below: image
  12. If you want to add/modify/delete any application, use the below screen: Click Next image
  13. You can sign the profile using below screen: Click Nextimage
  14. Profile summary will appear in the below screen. Click Finish to finish the profile creation.image
  15. On successful updation of profile, following main screen will appear. Click on the save button as shown in circle in below screenshot to save the profile: Profile will saved under the same shared location.image
  16. Resultant Folder structure of profile as saved at shared location: image  Please note the presence of second cab file. Whenever streaming profile is updated, new cab file is created. You can delete the old cab file if you don’t want to maintain history as old cab file might be used to rollback the changes.

XenApp: Automated streaming package publish using PowerShell

Purpose:

To publish application streaming package in XenApp automatically using PowerShell script.

Pre-requisite:

Following are the prerequisites for setting up the environment to execute PowerShell script to publish application in XenApp:

  1. .Net Framework 3.5 SP1 {Download it from Microsoft website}
  2. Microsoft PowerShell 1.0 {Download it from Microsoft website}
  3. XenApp Command technology preview{Download it from citrix site: https://www.citrix.com/English/ss/downloads/details.asp?downloadId=1687620&productId=186#top} : These commands are a PowerShell Tool Pack that allows managing most aspects related to XenApp.  They cover all of MFCOM functionality for features available in XenApp 5 and include functionality from both AMC and CMC.
  4. Person who is publishing application icon should have full administrative rights on Access management console and should have atleast read access rights on the shared location where streaming package is stored.
  5. Application users should also has read access rights on the shared location where streaming package is stored.

Install all the above components {step 1 – 3} in the given order onto the XenApp environment.

Solution: 

Below script is the solution. It has four parts:

  • Creation of input box for application information – {Line 10 – 99}
  • Creation the published application icon for streaming package – {Line 101-117}
  • Addition of users/groups to the application –{Line 119-120}
  • Assignment of servers to the published app –{Line 122-123}

    Script:

       1: # =========================================================

       2: # 

       3: # AUTHOR: Mohd Aslam

       4: # DATE  : 7/06/2010

       5: # 

       6: # COMMENT: This script will publish application streaming 

       7: # package in XenApp.

       8: # 

       9: # =========================================================

      10: [void] [System.Reflection.Assembly]::LoadWithPartialName(

      11: "System.Drawing") 

      12: [void] [System.Reflection.Assembly]::LoadWithPartialName(

      13: "System.Windows.Forms") 

      14:  

      15: $objForm = New-Object System.Windows.Forms.Form 

      16: $objForm.Text = "Server Desktop publish information"

      17: $objForm.Size = New-Object System.Drawing.Size(430,200) 

      18: $objForm.StartPosition = "CenterScreen"

      19:  

      20: $objForm.KeyPreview = $True

      21: $objForm.Add_KeyDown({if ($_.KeyCode -eq "Enter") 

      22:     {$x=$objTextBox.Text;$objForm.Close()}})

      23: $objForm.Add_KeyDown({if ($_.KeyCode -eq "Escape") 

      24:     {$objForm.Close()}})

      25:  

      26: $OKButton = New-Object System.Windows.Forms.Button

      27: $OKButton.Location = New-Object System.Drawing.Size(190,140)

      28: $OKButton.Size = New-Object System.Drawing.Size(75,23)

      29: $OKButton.Text = "OK"

      30: $OKButton.Add_Click(

      31: {

      32: $AppName=$objAppName.Text;

      33: $AppUsers=$objAppUsers.Text;

      34: $AppServers=$objAppServers.Text;

      35: $objForm.Close()

      36: }

      37: )

      38: $objForm.Controls.Add($OKButton)

      39:  

      40: $CancelButton = New-Object System.Windows.Forms.Button

      41: $CancelButton.Location = New-Object System.Drawing.Size(290,140)

      42: $CancelButton.Size = New-Object System.Drawing.Size(75,23)

      43: $CancelButton.Text = "Cancel"

      44: $CancelButton.Add_Click(

      45: {

      46: $objForm.Close()

      47: }

      48: )

      49: $objForm.Controls.Add($CancelButton)

      50:  

      51: $objLabel = New-Object System.Windows.Forms.Label

      52: $objLabel.Location = New-Object System.Drawing.Size(10,15) 

      53: $objLabel.Size = New-Object System.Drawing.Size(280,20) 

      54: $objLabel.Text = "Please enter the information in the space below:"

      55: $objForm.Controls.Add($objLabel) 

      56:  

      57: $objLbl_AppName = New-Object System.Windows.Forms.Label

      58: $objLbl_AppName.Location = New-Object System.Drawing.Size(10,40) 

      59: $objLbl_AppName.Size = New-Object System.Drawing.Size(160,20) 

      60: $objLbl_AppName.Text = "Application Name:"

      61: $objForm.Controls.Add($objLbl_AppName) 

      62:  

      63: $objAppName = New-Object System.Windows.Forms.TextBox 

      64: $objAppName.Location = New-Object System.Drawing.Size(190,40) 

      65: $objAppName.Size = New-Object System.Drawing.Size(205,20) 

      66: $objForm.Controls.Add($objAppName) 

      67:  

      68: $objLbl_AppUsers = New-Object System.Windows.Forms.Label

      69: $objLbl_AppUsers.Location = New-Object System.Drawing.Size(10,70) 

      70: $objLbl_AppUsers.Size = New-Object System.Drawing.Size(160,20) 

      71: $objLbl_AppUsers.Text = "Application Users*:"

      72: $objForm.Controls.Add($objLbl_AppUsers) 

      73:  

      74: $objAppUsers = New-Object System.Windows.Forms.TextBox 

      75: $objAppUsers.Location = New-Object System.Drawing.Size(190,70) 

      76: $objAppUsers.Size = New-Object System.Drawing.Size(205,20) 

      77: $objForm.Controls.Add($objAppUsers) 

      78:  

      79: $objLbl_Server = New-Object System.Windows.Forms.Label

      80: $objLbl_Server.Location = New-Object System.Drawing.Size(10,100) 

      81: $objLbl_Server.Size = New-Object System.Drawing.Size(160,20) 

      82: $objLbl_Server.Text = "Servers*:"

      83: $objForm.Controls.Add($objLbl_Server) 

      84:  

      85: $objAppServers = New-Object System.Windows.Forms.TextBox 

      86: $objAppServers.Location = New-Object System.Drawing.Size(190,100) 

      87: $objAppServers.Size = New-Object System.Drawing.Size(205,20) 

      88: $objForm.Controls.Add($objAppServers) 

      89:  

      90: $objLbl_Server = New-Object System.Windows.Forms.Label

      91: $objLbl_Server.Location = New-Object System.Drawing.Size(10,120) 

      92: $objLbl_Server.Size = New-Object System.Drawing.Size(180,20) 

      93: $objLbl_Server.Text = "*: Enter ';' separated data if any"

      94: $objForm.Controls.Add($objLbl_Server) 

      95:  

      96: $objForm.Topmost = $True

      97:  

      98: $objForm.Add_Shown({$objForm.Activate()})

      99: [void] $objForm.ShowDialog()

     100:  

     101: New-XAApplication -BrowserName $AppName `

     102: -DisplayName $AppName -FolderPath "Applications/Office" `

     103: -Enabled $true `

     104: -ApplicationType StreamedToServer `

     105: –ProfileLocation "\\Server\App_Profiles\MSOffice - Word.profile" `

     106: –ProfileProgramName "Microsoft Office Word 2003" `

     107: –IconStream (

     108: Get-XAIconStream `

     109: -profilelocation "\\Server\App_Profiles\MSOffice - Word.profile" `

     110: -profileprogramname "Microsoft Office Word 2003" `

     111: –Index 0) `

     112: -AnonymousConnectionsAllowed $false `

     113: -InstanceLimit "-1" `

     114: -ColorDepth 1 `

     115: -AudioRequired $false `

     116: -ClientFolder "Office"`

     117: -ProfileProgramArguments %* `

     118:  

     119: Add-XAApplicationAccount -BrowserName $AppName `

     120: -Accounts $AppUsers.Split(";")

     121:  

     122: Add-XAApplicationServer -BrowserName $AppName `

     123: -ServerNames $AppServers.Split(";")

     How to Run above script?:

    Save above script to some location with .ps1 extension. To Run above script, go to “Programs > Citrix > XenApp Commands” and click “Windows PowerShell with XenApp Commands (CTP2)” icon. It will launch PowerShell command prompt.

    On the PowerShell command prompt, write script name with full location and click enter. Script will run and below screen will be displayed:

    image

    Enter all the required data and click “Ok”. For application users and servers, multiple data can be entered separated by “;”.

    Following screen will be displayed containing information about the published icon.

    image

    To confirm the successful publish, go to access management console and see the published icon as:

    image

                                                                    –Finish–